Last week, I walked you through how I meal plan on a budget of $100 per week for a family of four. I’m going to walk you through my meal-planning process again, this time for a stock-up week. If you haven’t read that first post yet, start there, because I’m not going to explain each step this time. I am going to show you how I stay within budget, even when I need to stock up on more items than I did last week.
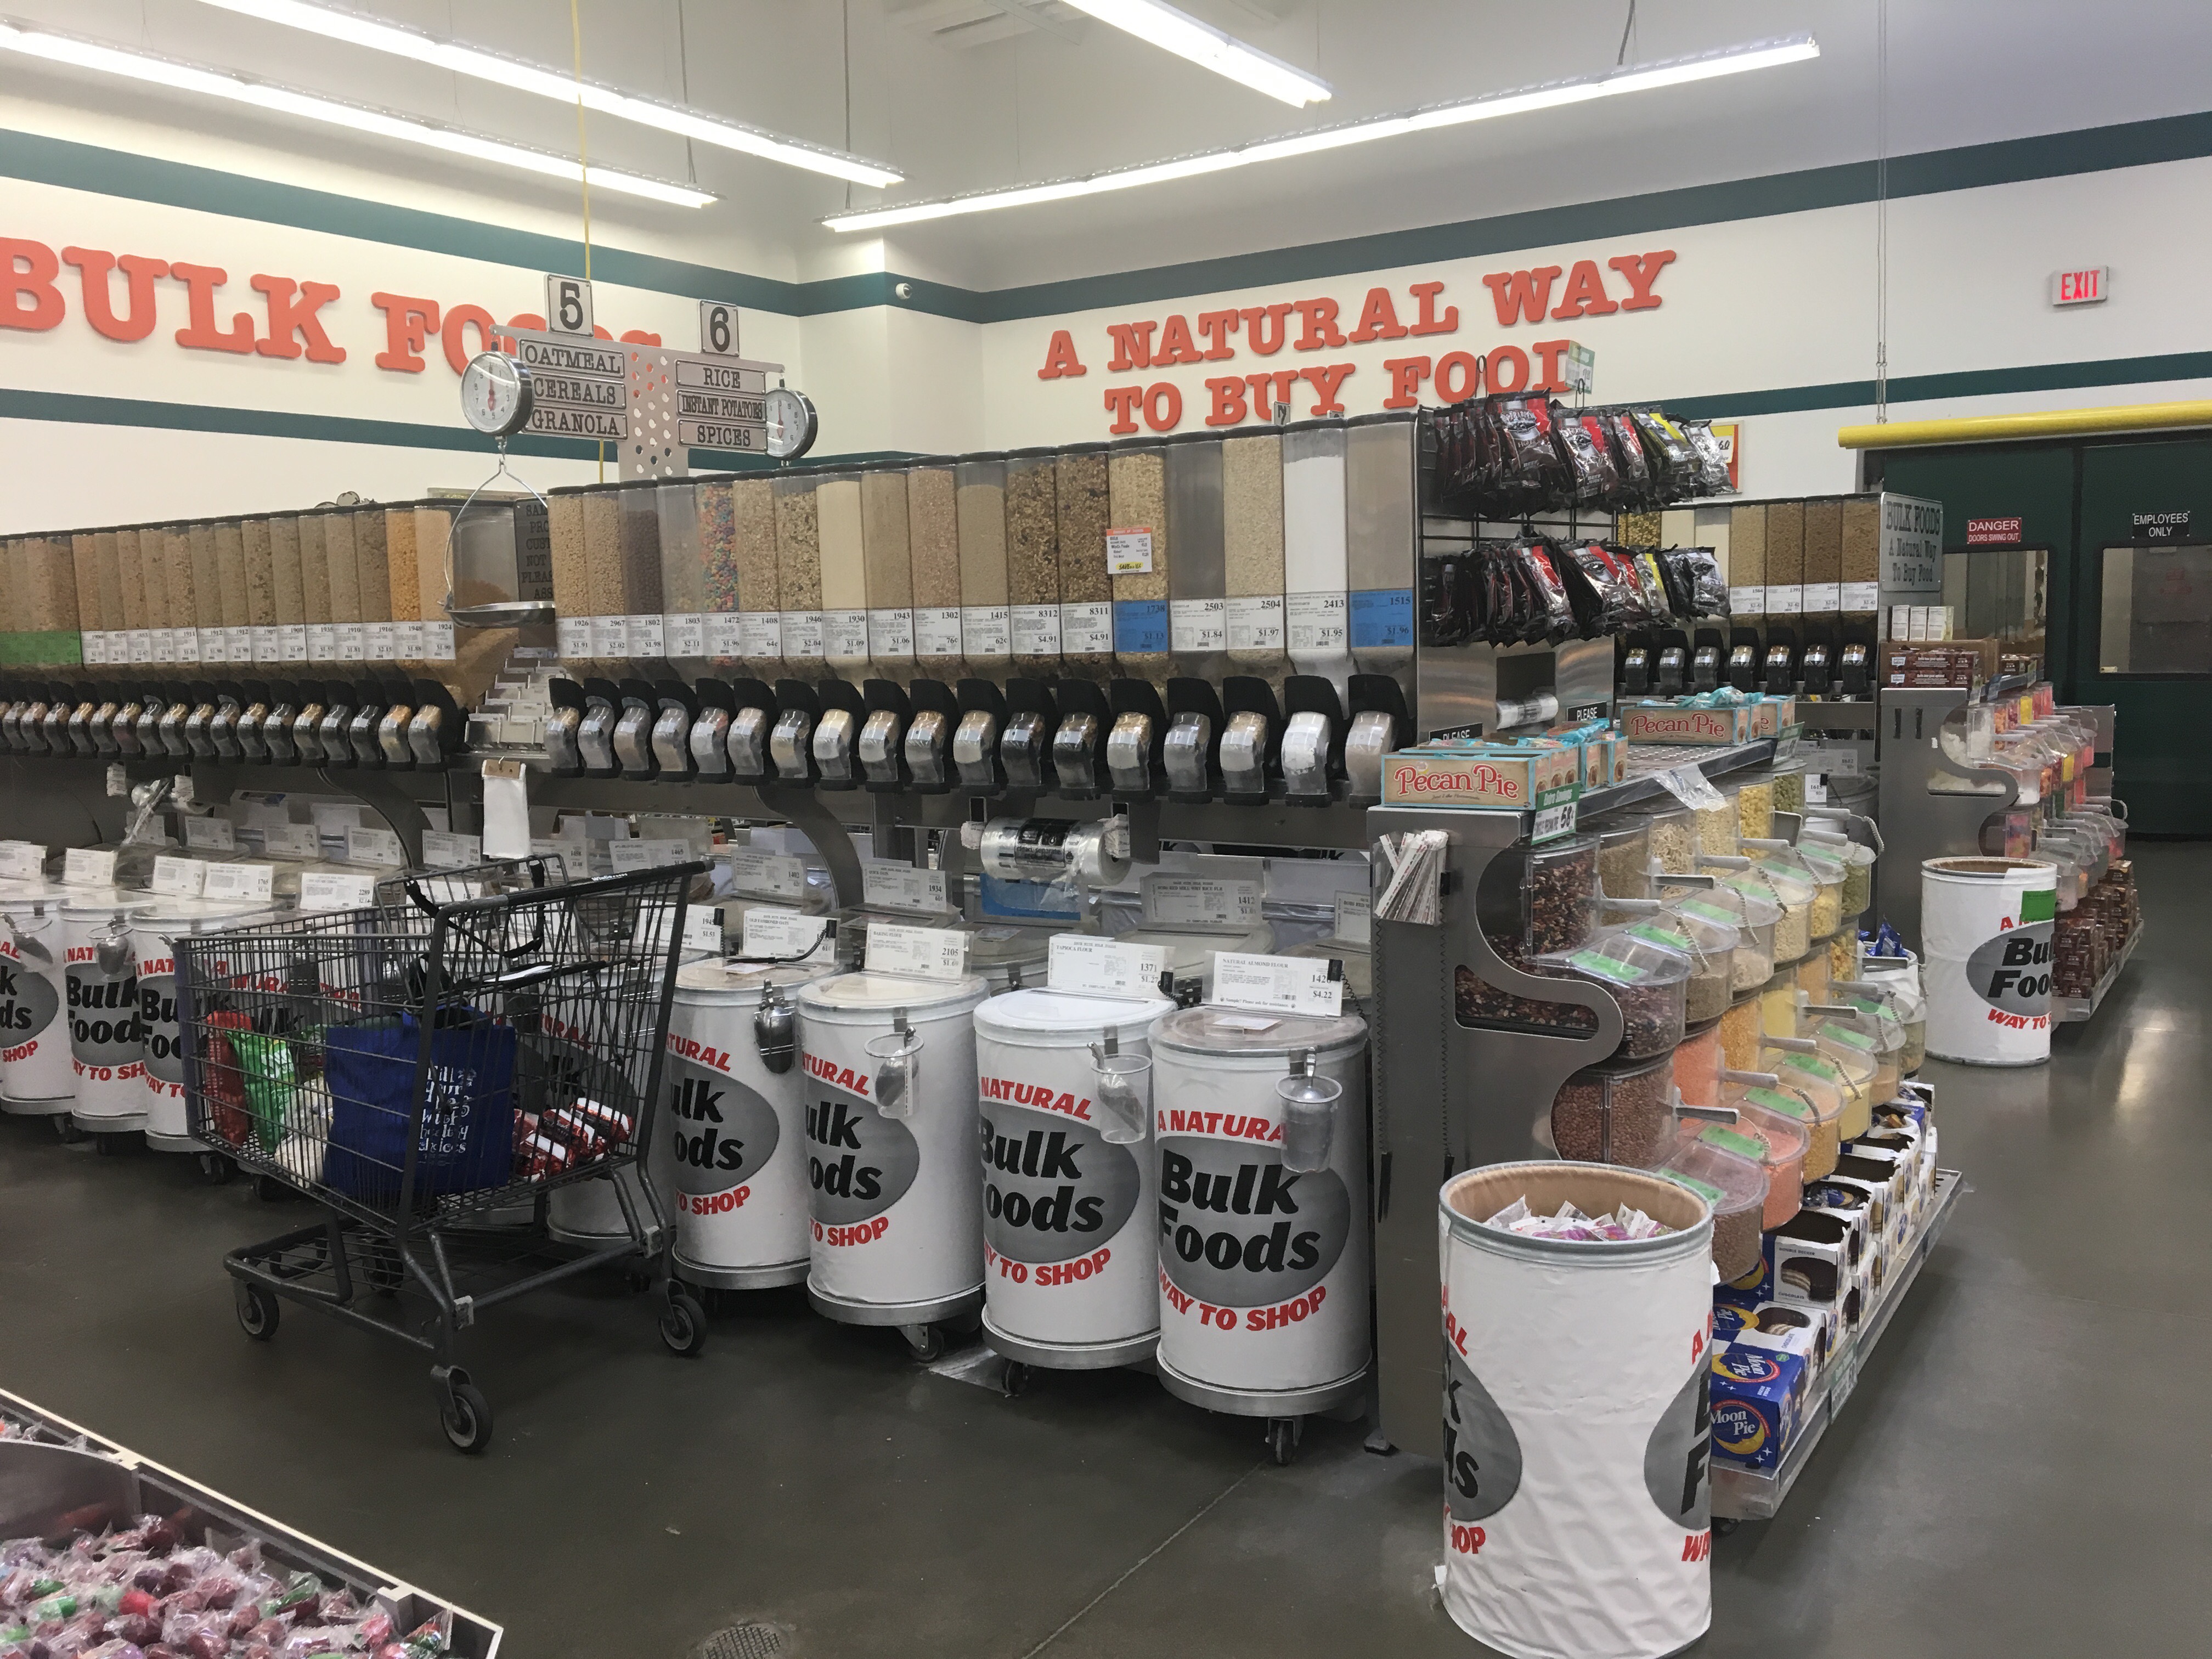
Besides the amount that I’m buying, the main difference between a “stock-up week” and a “top-off week” is that I make sure to go to a store with an excellently-priced bulk section (Winco) for a stock-up week. Buying items in bulk is not only cheaper, but more customizable, and prevents food and packaging waste. Buying food in bulk allows you to select the exact amount that you need, want, or can afford, and can help make staying within budget much easier. I’ll start with a quick walk-through of the meal-planning process, then I’ll show you how bulk buying makes my $100-per-week grocery budget possible.
So here we go! Follow along with my budget-conscious meal planning process this week:
Know your budget
If you read last week’s post, you’ll know that my grocery budget last week was $85 for a “top-off week.” Since this week is a stock-up week, my budget will be higher. Today I’m working with a budget of $115. That gets me to an average of…you guessed it! $100 per week.
Utilize food distribution programs, if you can find them.
This week, pickin’s were more slim, so I only ended up with a nice little green bell pepper and a bag of chips.
Shop Your Cupboards/Pantry/Fridge/Freezer
Here’s where I’m at this week:
Need to use up:
mozzarella cheese sticks
a few random Swiss cheese slices
leftover tomato sauce
lots of dinner leftovers – I won’t need to buy any lunch stuff for this week
salad
baby carrots & other snack veggies
deli meat
Available:
dried grains: pasta, rice, quinoa, oats
dried chili beans
trail mix
lots of canned goods
cheese
1 gallon milk
potatoes, onions
Use a master list
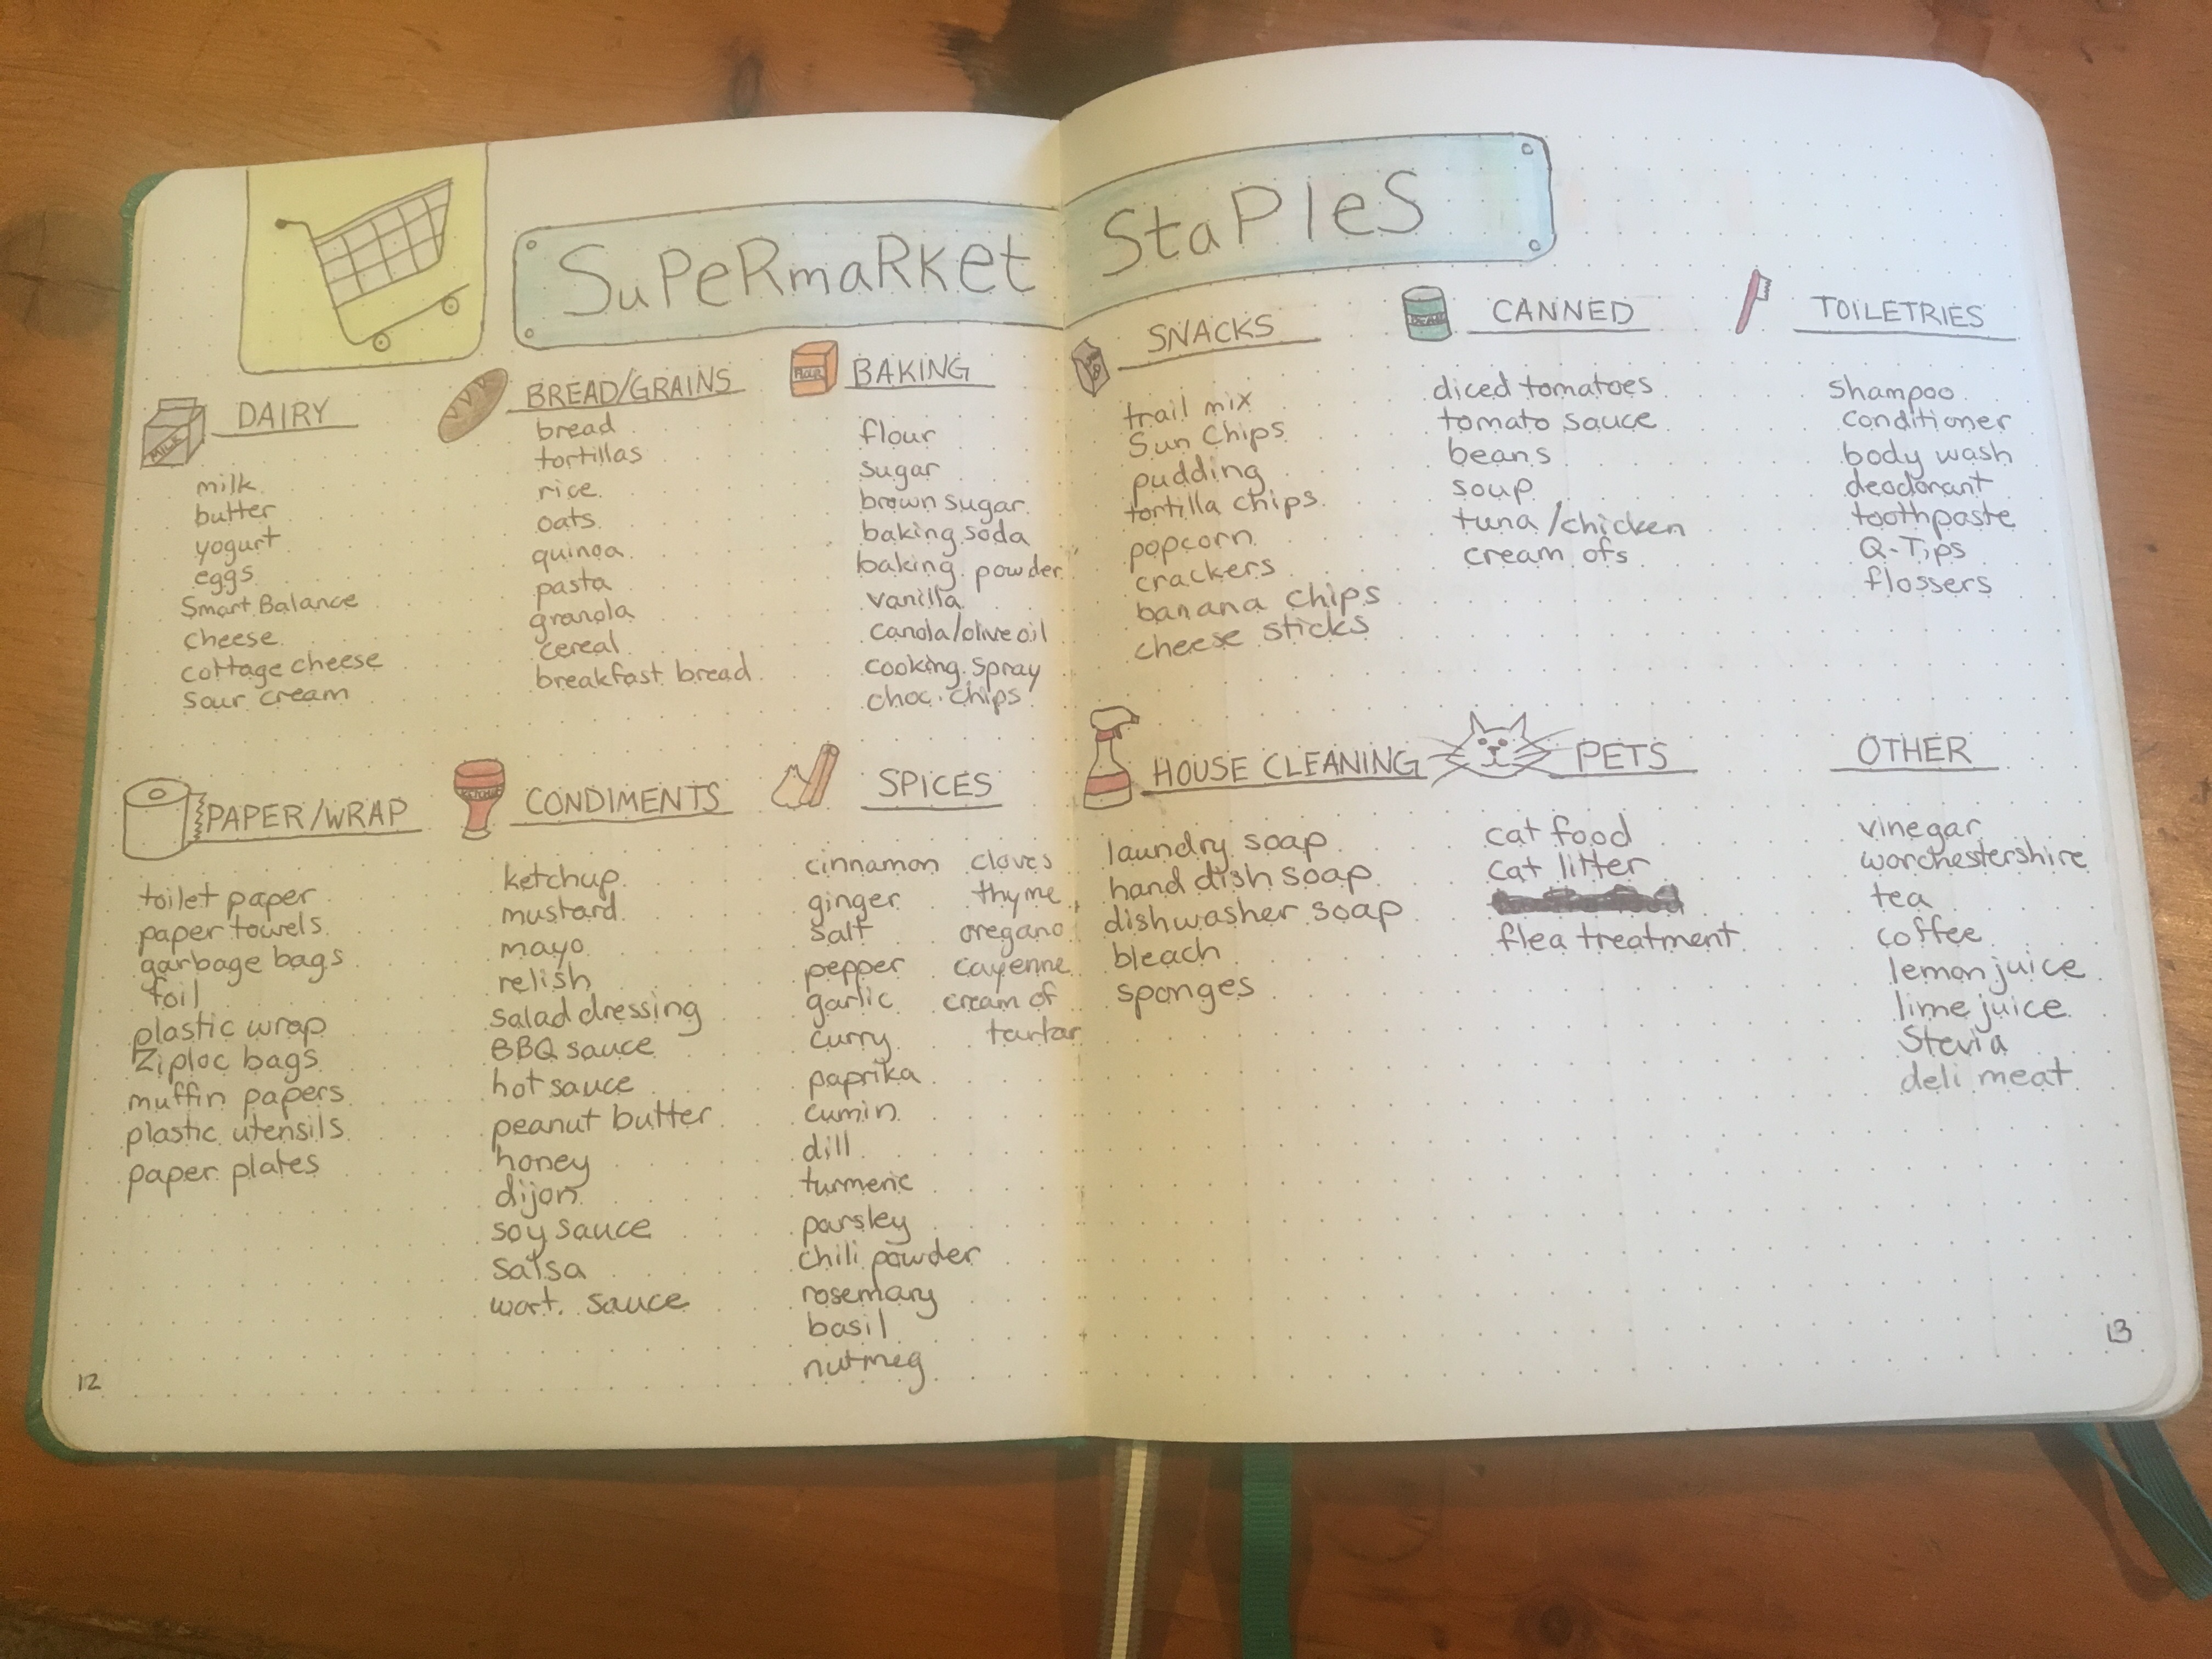
For stock-up weeks, I use a “supermarket staples list” that I modified from a post on Pinterest.
This lists all of the things I like to always have in stock (plus a few that I rotate through, like snacks). On stock-up week, I skim through the list and go through my kitchen to make sure I don’t miss anything that we might need or might be out of. Add them to the list!
Take stock and decide what to make
Tonight is our monthly “family fun night,” where we go to a local restaurant/arcade and hang out, so that covers dinner. Since I need to use up tomato sauce and cheese sticks, I’ll make a family favorite – pizza rolls – that uses both of those. We haven’t had fish in a while, and Winco has some really affordable salmon, so I’ll grab some of that and we’ll have steamed broccoli and mashed potatoes with it. Thursday’s a busy evening so I’ll make that a crock pot meal. Maybe a pot roast with some of those baby carrots. Friday I know we will be at a high school football game, so we’ll probably snack at home beforehand and maybe grab some snacks at the game.
That’s okay to do, by the way, just in case any clean-eating policeman ever told you it wasn’t.
Aaaand for breakfasts I’ll use that lunch meat and extra cheese to make some breakfast sandwiches.
Make your shopping list (include estimated prices)
After going through my stock-up list and the meals for the week, here’s what my list looks like:
Click here for a copy of this shopping list/meal planning template.
On a stock-up week, I try to leave a bit of budget room for whatever meat might be on sale that week. Sale meat at Winco can be a heck of a deal, so Winco trips are good opportunities to stock the freezer.
My estimated costs for this grocery trip were only $92.50, so I’ll add ~$23-25 worth of sale meat to the list. If we weren’t going to be eating out of our restaurant budget for two meals this week, I probably wouldn’t be able to do quite so much but in this case it worked out.
Shop!
As I was shopping, I had some extra room in the budget, so I tossed in an extra dessert and a few snack foods that I’ll save for next week. We have a part of our pantry where I save up food when I get a good deal or have extra room in the budget. That helps each week be a little easier budget-wise, since I’ve always got odds and ends saved up in there.
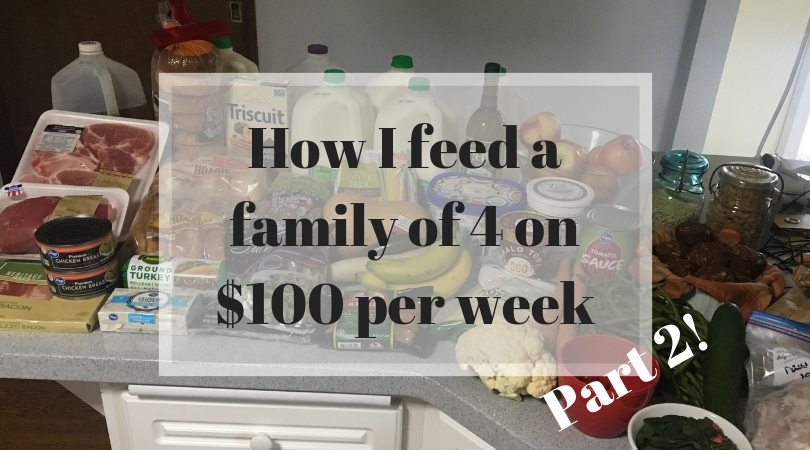
Here’s my haul, for the grand total of $114.04! I love when it comes out so perfectly.
If you haven’t already, go check out part 1 of meal planning on a budget – both posts are important to understand the whole picture! And stay tuned for more tips on eating well on a budget!
Today we’re talking about one of the most infuriating things that can happen to you when you’re working hard to stick to a food budget: food waste! You’ve been there – you take all the time to meal plan, budget accordingly, shop carefully, and then…10 days later, your beautiful broccoli is limp and gray, your spinach is slimy, and – do you smell that? Yep, it’s half of a tray of raw chicken leftover from Monday’s meal. To the trash it goes!
Few things are as obnoxious and maddening as tossing beautifully budgeted money and carefully chosen nutritious food into the trash because it made its way to the depths of the fridge and was forgotten. All those good intentions, covered in fuzz…
A few years ago, when we were really focusing on getting our household budget zeroed in (here’s lookin’ at you, Dave Ramsey!), I was working so hard to get our food budget down that I would about lose it if I had to throw food away. Especially – and Heaven forbid – expensive meat! I had to come up with a solution to stop wasting food and money. So I played around with a bunch of different options until I found a flexible fix that actually takes less work than what I was doing before. It is definitely worth a try if you, too, are sick of tossing good money in the trash.
If you read my meal-planning-on-a-budget post, you may have noticed that there were two dinner plans that might seem a little strange: “scrounge” and “whatever.”
These are two days that I schedule into every week’s meal plan as built-in “use up” days. These dinners are specifically set aside for the sole purpose of eating up food that is already in the fridge (in our house, we affectionately refer to them as “Whatever Wednesday” and “Scrounge-It Sunday”).
Use-up days serve a few purposes: 1) it gives the chef(s) in your house a day off, 2) it pleases the free spirits in the family who like to eat what they “feel like” eating, and 3) it gives you the chance to dig things out of the dark corners of the fridge and pantry before they start to become fuzzy.
Because fuzzy food = dollars wasted.
So plan at least 1 (possibly 2) use-up days into your regular routine. Trial-and-error will help you figure out how many is the right amount for your household. Too many and you’ll be short on food, too few and you’ll be tossing fuzzy food (aka money) right in the trash.
When a use-up day rolls around, we usually approach it one of a few ways:
If we have a lot of leftovers that need using up, we dig into all the corners of the fridge/pantry, pull out all the stuff that needs to go, and put it on the island/bar/table. Then it’s a free for all!
If there’s a variety of leftover options but not so many that we desperately need to eat certain things, then everyone just gets what they want to eat for dinner out of the fridge.
If there isn’t much already made or if I have a hankering to be creative, I will sometimes use leftover ingredients to toss together something easy. This can lead to some interesting combos, but they usually turn out tasty! Chopped-up cheeseburger patty with roasted vegetable garlic pasta, anyone? 🙂
Ultimately, the goal is that your perishable ingredients basically get wiped out every 1-2 weeks. This keeps you from having to toss all that great, paid-for nutrition, and keeps your fridge tidy and fuzz-free!
Sidenote for those with kids:
Depending on how old your kiddos are, use-up days can be a fun opportunity for them to learn and practice nutrition and balanced eating.
Ages 4-8: Sort the options into piles based on their food group (fruit, veggies, dairy/dairy alternatives, protein, and grains). Challenge your child to eat one from each for a complete meal! This also helps assuage the inevitable mom-fear that your one child (you know the one) will eat 7 yogurts and nothing else. Sometimes I offer a special use-up day dessert for those who choose something from all 5. This gives them a chance to learn and think about food groups, and you a chance to see what they tend to choose on their own!
Ages 9+: You can still challenge your kiddos to hit all five food groups, though they likely won’t need the visual of the sorted groups at this age. You can take advantage of use-up days to host your own cooking show-style challenges using the ingredients that need to be used up. It doesn’t have to be fancy, just throw something together as a family with the ingredients you have. This helps kids enjoy and be creative with food, all while learning to cook!
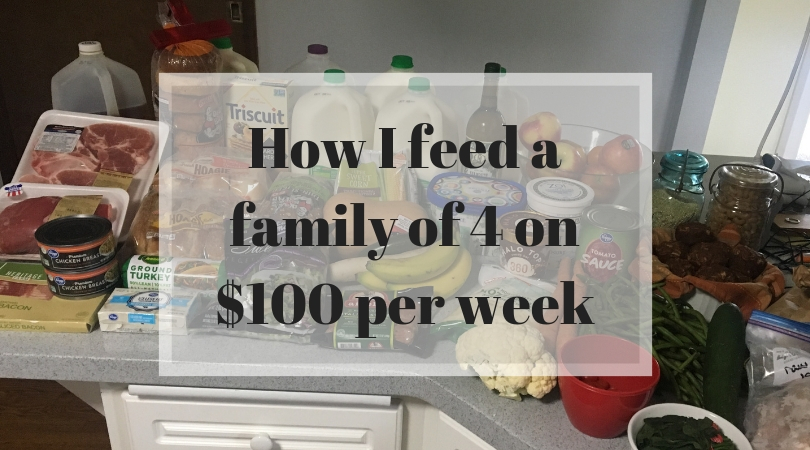
To kick off my series on Eating Well on a Budget, I’m going to start off by showing you how to meal plan on a budget. The easiest way to do that is to show you as I do our meal planning for the week! I’ve been feeding a family of 4 (2 adults and 2 currently 15- and 12-year-old boys) on an average budget of $100 per week for about 4 years now.
At first, it was a struggle and required a lot of work, but after a few months it became much easier and now I would venture to say it’s second nature. Don’t feel like you have to incorporate every money-saving tip all at once. Add in one at a time. Every little bit helps, and taking it on all at once can be overwhelming.
There are a few clarifications I should give on this:
This does notinclude non-food household items (toilet paper, aluminum foil, hygiene products, etc) – we have a separate budget for those.
This does not include our boys’ school lunches. That comes out of a separate budget. During the first couple of summers, we stuck to the $100 per week budget during the summer without much trouble, but in the last couple of years we’ve had a teenage boy so…we upped it to $125 per week. 🙂
Some of the things that help make this budget easier require a bit of advance planning (canning and freezing food in the summer, for example). At first, I only dabbled in these (and still stayed within budget – it just took more work to do so). I have a decent routine for these now and hope to add more (garden, here we come!) in the future. When you first start, it’s unlikely you will have these benefits right off the bat, so keep that in mind. It’s a little easier for me now for these reasons, but throughout the course of the next few weeks I’m going to teach you how to do all of the things I do to save money on food. Yes, we’re going to talk about canning!
Previously, I did a post on how to meal plan (including a free printable template!). That is an excellent supplement to this article – in fact, you may want to start there, read through step 2, then come back here and continue on. This post will be a much more in-depth look at using your budget as a jumping point, as is mentioned in that article.
So here we go! Follow along with my budget-conscious meal planning process this week:
Know your budget
You can’t very well eat on a budget if you don’t know what your budget is! Decide how much you’re going to spend. For us, I tend to alternate between “stock-up weeks” where I go to Winco and buy regular groceries as well as bulk dry goods to top off our supplies, and “top-off weeks” where I fill in the gaps with produce/meat/whatever else we need. Winco is the cheapest option in our area, but it’s a bit farther away from us than some other stores, so my top-off weeks are sometimes done at a closer store like Fred Meyer. I spend more on stock-up weeks (typically about $120-125) and less on top-off weeks (about $75-80).
This particular week is a top-off week, so this week’s budget will be $85.
Look for food distribution programs in your area.
I’m not referring to food banks or need-based programs (though please seek out those valuable resources if you need them), but rather food waste prevention programs. In my area, for example, there is a large warehouse where loads of nearly-expired food and produce collects every week. From there, people deliver it to different food distribution locations around the area. These programs are a win-win-win. Grocery stores have a place to send food they can no longer sell, landfills avoid thousands of pounds of food waste, and we get the benefit of free nutritious food! Search for food waste prevention programs online to see what might be available in your area.
Since this food source is not predictable (some weeks there is a lot, and other weeks, nothing at all), I do my meal planning after I go, so I know what I will have. Here is this week’s food distribution haul – totally free!
There was quite a bit available this week, so this will help my grocery budget a lot! Keep in mind though, this food is nearly expired, so you’ll want to plan to use it soon. Don’t dilly dally with this stuff – it’s on its way out!
Shop Your Cupboards/Pantry/Fridge/Freezer
One of the greatest contributors to high grocery bills is buying duplicates of things we already have, then trashing wasted extras. You’ll notice that a lot of money-saving tips are also food waste-prevention tips because, well, food wasted = dollars wasted.
Do a quick skim of your fridge, produce, cupboards, and freezer before even starting your meal plan. Take special note of the things that need to be used up soon, particularly meat and produce. Here’s my list for this week (not counting my food distribution goodies):
Need to use up:
cilantro
avocado
apples
cauliflower
spinach
fall harvest muffins (leftover)
chicken breasts (4)
mushrooms
Available:
dried grains: pasta, rice, quinoa, oats
baking stuff (flour, sugar, etc)
dried chili beans
clementine oranges
yogurt
trail mix
whole grain crackers
mozzarella cheese sticks
lots of canned goods
cheddar cheese
lunch meat
eggs
2 gallons milk (we go through 4 per week usually!)
fresh-pressed apple cider (YUM)
I don’t usually write them all out like this, but for the sake of walking you through the process that happens in my head, here it is. Be aware that since this is a top-off week, I have more available than I will on stock-up weeks.
Check for sales and coupons
I’ve provided a lot more detail about this step here, (definitely check it out if you wanted to get started with strategic couponing). Either find a store that puts out a weekly ad, or a store that has killer prices all around (yay Winco!). If there’s a weekly ad, check for the best sales, especially on meat and produce, and make a list of those. What’s on sale and healthful is what you’re making! Use any coupons you have to create more good deals.
Take stock and decide what to make
Look at the list of what you’ve got available and what’s a great deal at the store. What can you make with these? If you’re struggling to come up with ideas, use a search-by-ingredient database to help you find recipes.
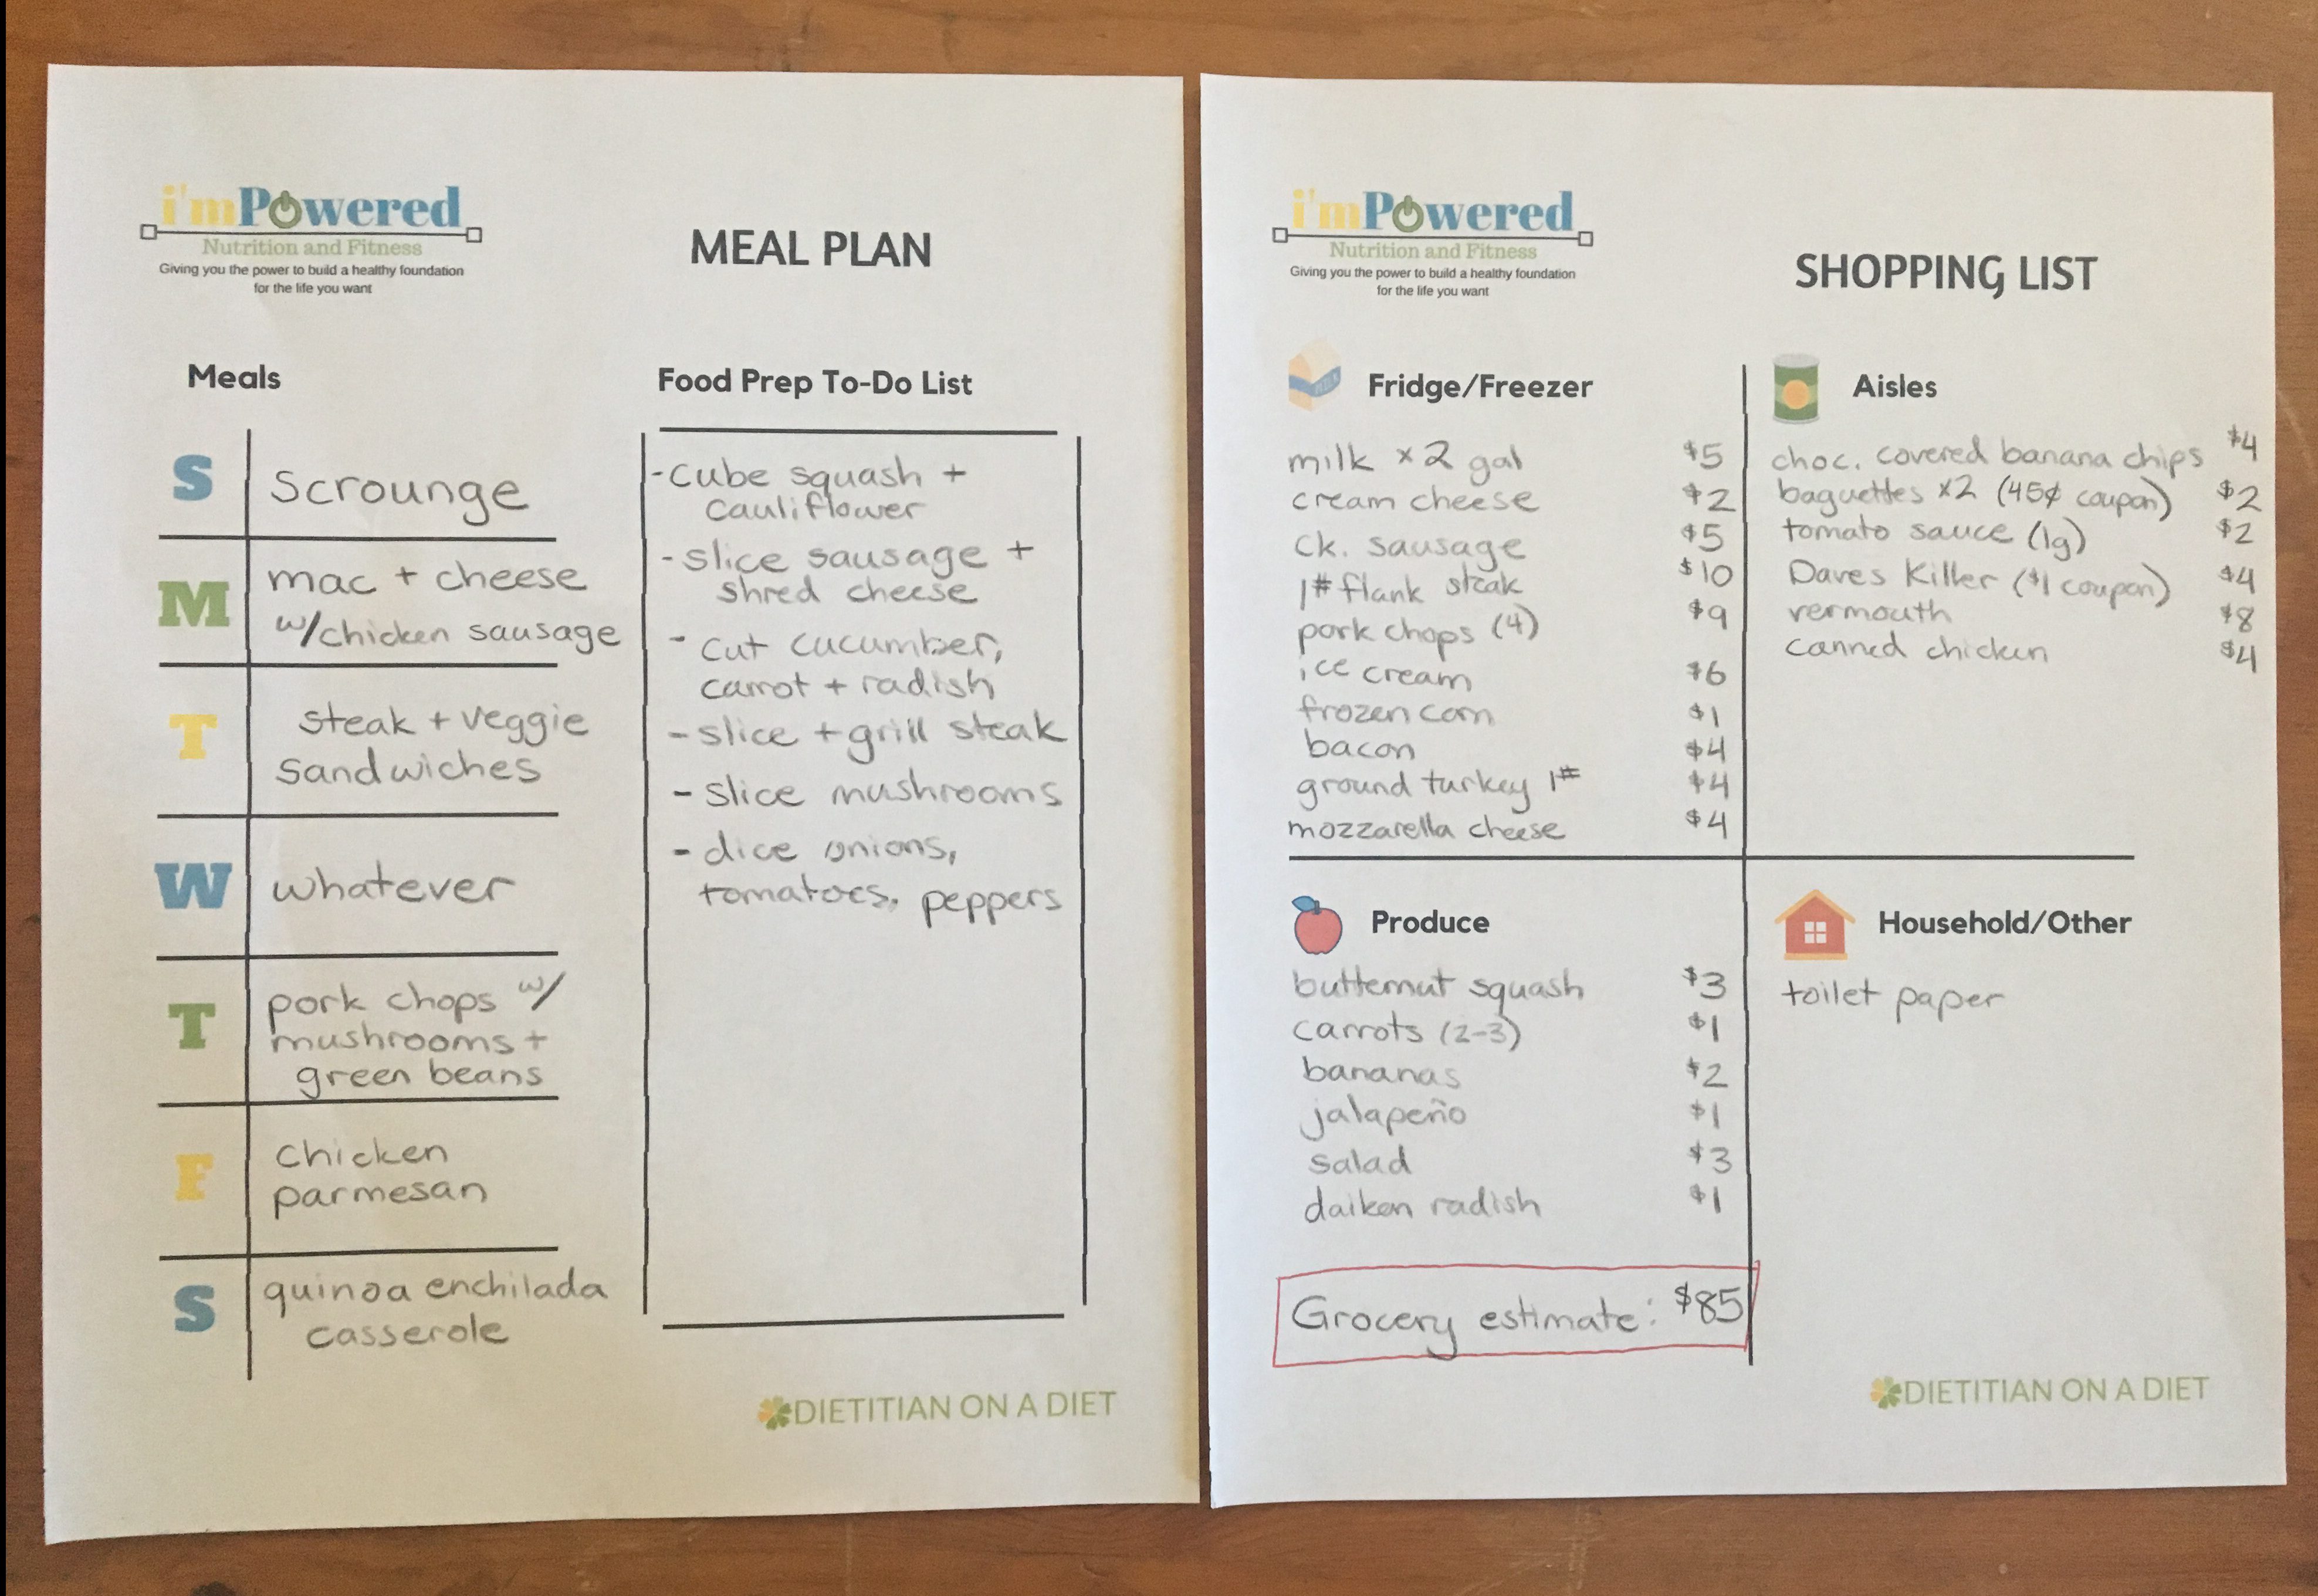
This week, we have several Mexican-type ingredients (tomatoes, cilantro, avocado, green pepper, onions) so I think I’ll make an enchilada quinoa casserole with those. My kids have been requesting mac and cheese (I have a recipe that uses an entire head of cauliflower and a butternut squash in the sauce!) so I’ll put that in there too. My husband loves Vietnamese steak sandwiches that use the cucumber I got from the food distribution, so I’ll include those. I’ll round out the week of dinners with pork chops and chicken parmesan.
Make your shopping list
Go through your planned meals and add to your shopping list anything that you don’t already have and need to buy. I like to divide mine roughly by sections of the grocery store just to save time wandering. Include a rounded-up price estimate next to each item.
For us, lunches are typically dinner leftovers, and/or salad with canned chicken, so I’ll put salad and chicken on the list. I usually make sure we have two different types of breakfast options besides eggs, and oatmeal. This week, I have the bagels from food distribution and my fall harvest veggie muffins, so I’ll just make sure to pick up another type of breakfast protein to pair with those. We have quite a few fruits, veggies, and snacks already, and plenty of smoothie ingredients. I also typically plan to have dessert once or twice a week, so I’ll toss in some ice cream as well. Here’s my completed list:
Click here for a copy of this shopping list/meal planning template. And to answer your question, no…my grocery list is never this neat. I used my best penmanship and avoided using too much of my made-up shorthand for your sake. You’re welcome. 🙂 Also, if you’re wondering what “scrounge” and “whatever” are all about – they can seriously help decrease your food costs and waste! Click here to read more about those.
Quickly tally your estimated prices to make sure you’ll be within your budget. If not, drop off unnecessary ingredients (garnishes, extra snacks/desserts, etc) until your estimate is within your budget. You’ll notice that there are a few ingredients on my list that are not particularly “low cost” items, like flank steak, Dave’s Killer Bread, and vermouth for my pork chop recipe. Regardless, we want to eat these and my estimate is still at budget. If I cut those or swapped them for cheaper alternatives, I could bring the cost down even further!
Shop!
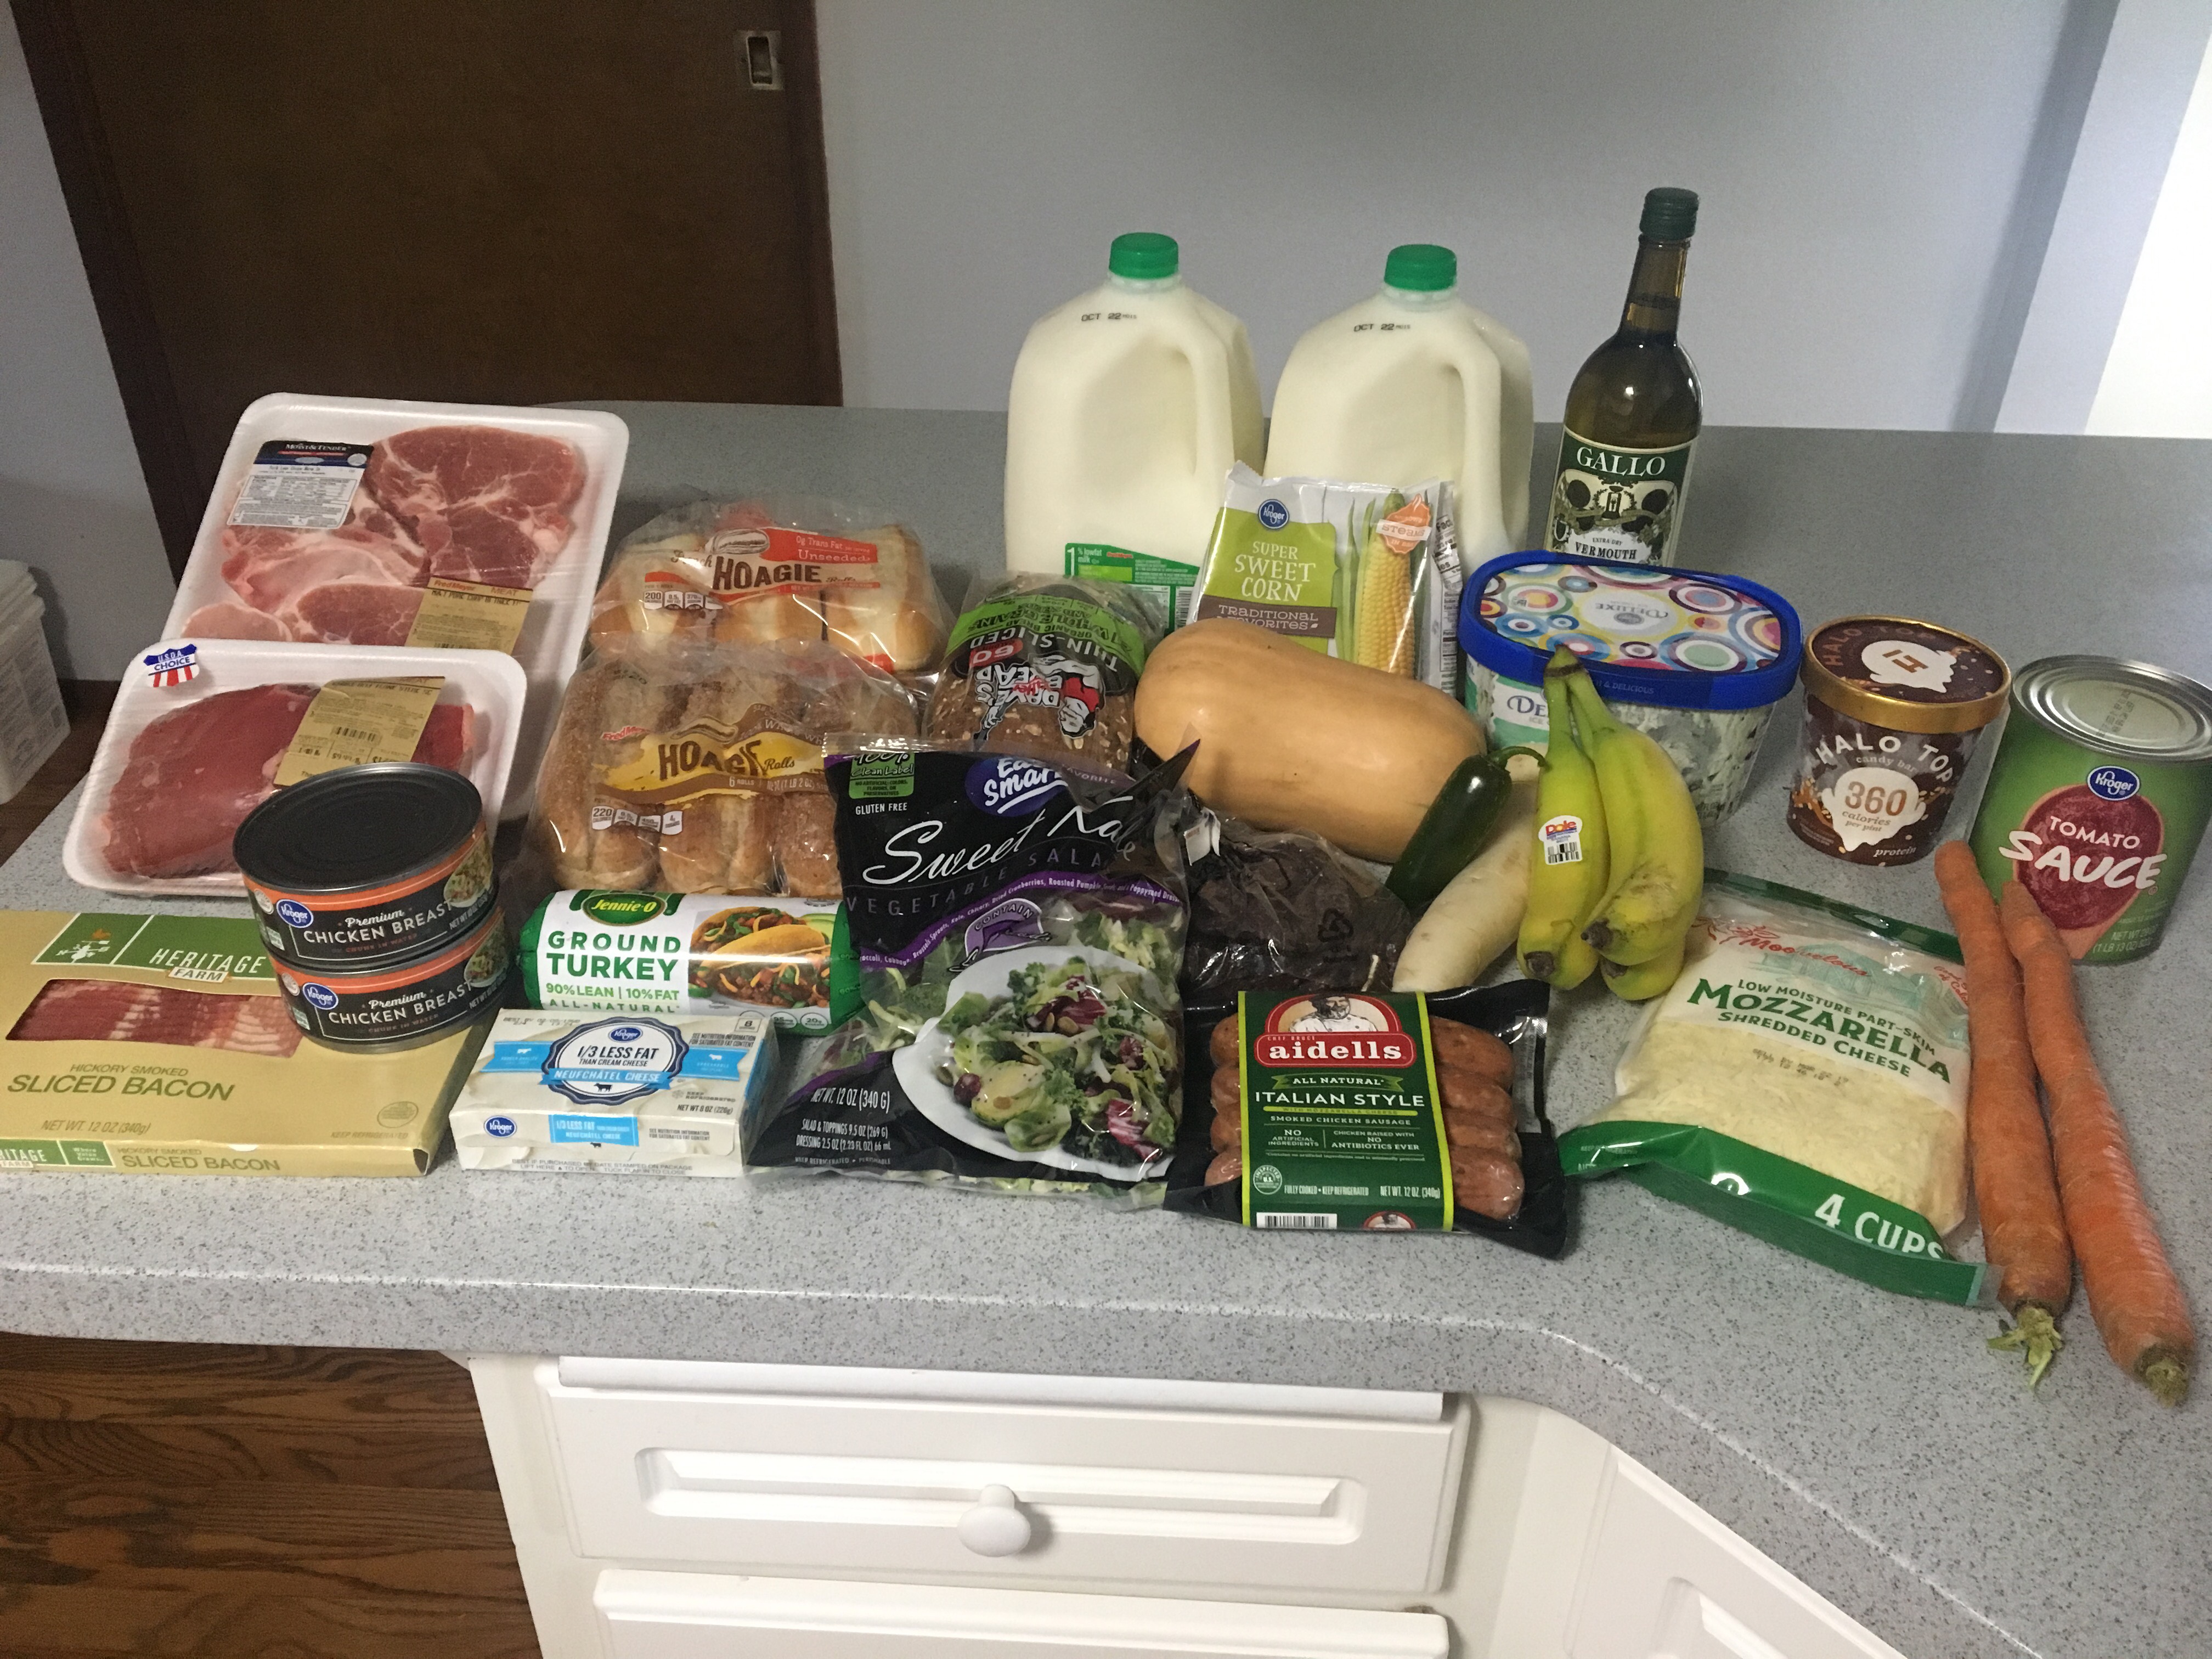
Take your budget-conscious shopping list to the store and get the goods! If my estimate is very close to my budget, I like to keep a quick, rounded-up tally on the calculator on my phone as I put items in my cart to avoid overspending. If I have a bit of a buffer, I don’t bother with this. You’ll notice that I underestimated the costs of some things (hello, $13 PER POUND flank steak! Sheesh!), but rounding up on my estimates usually gives me some wiggle room.
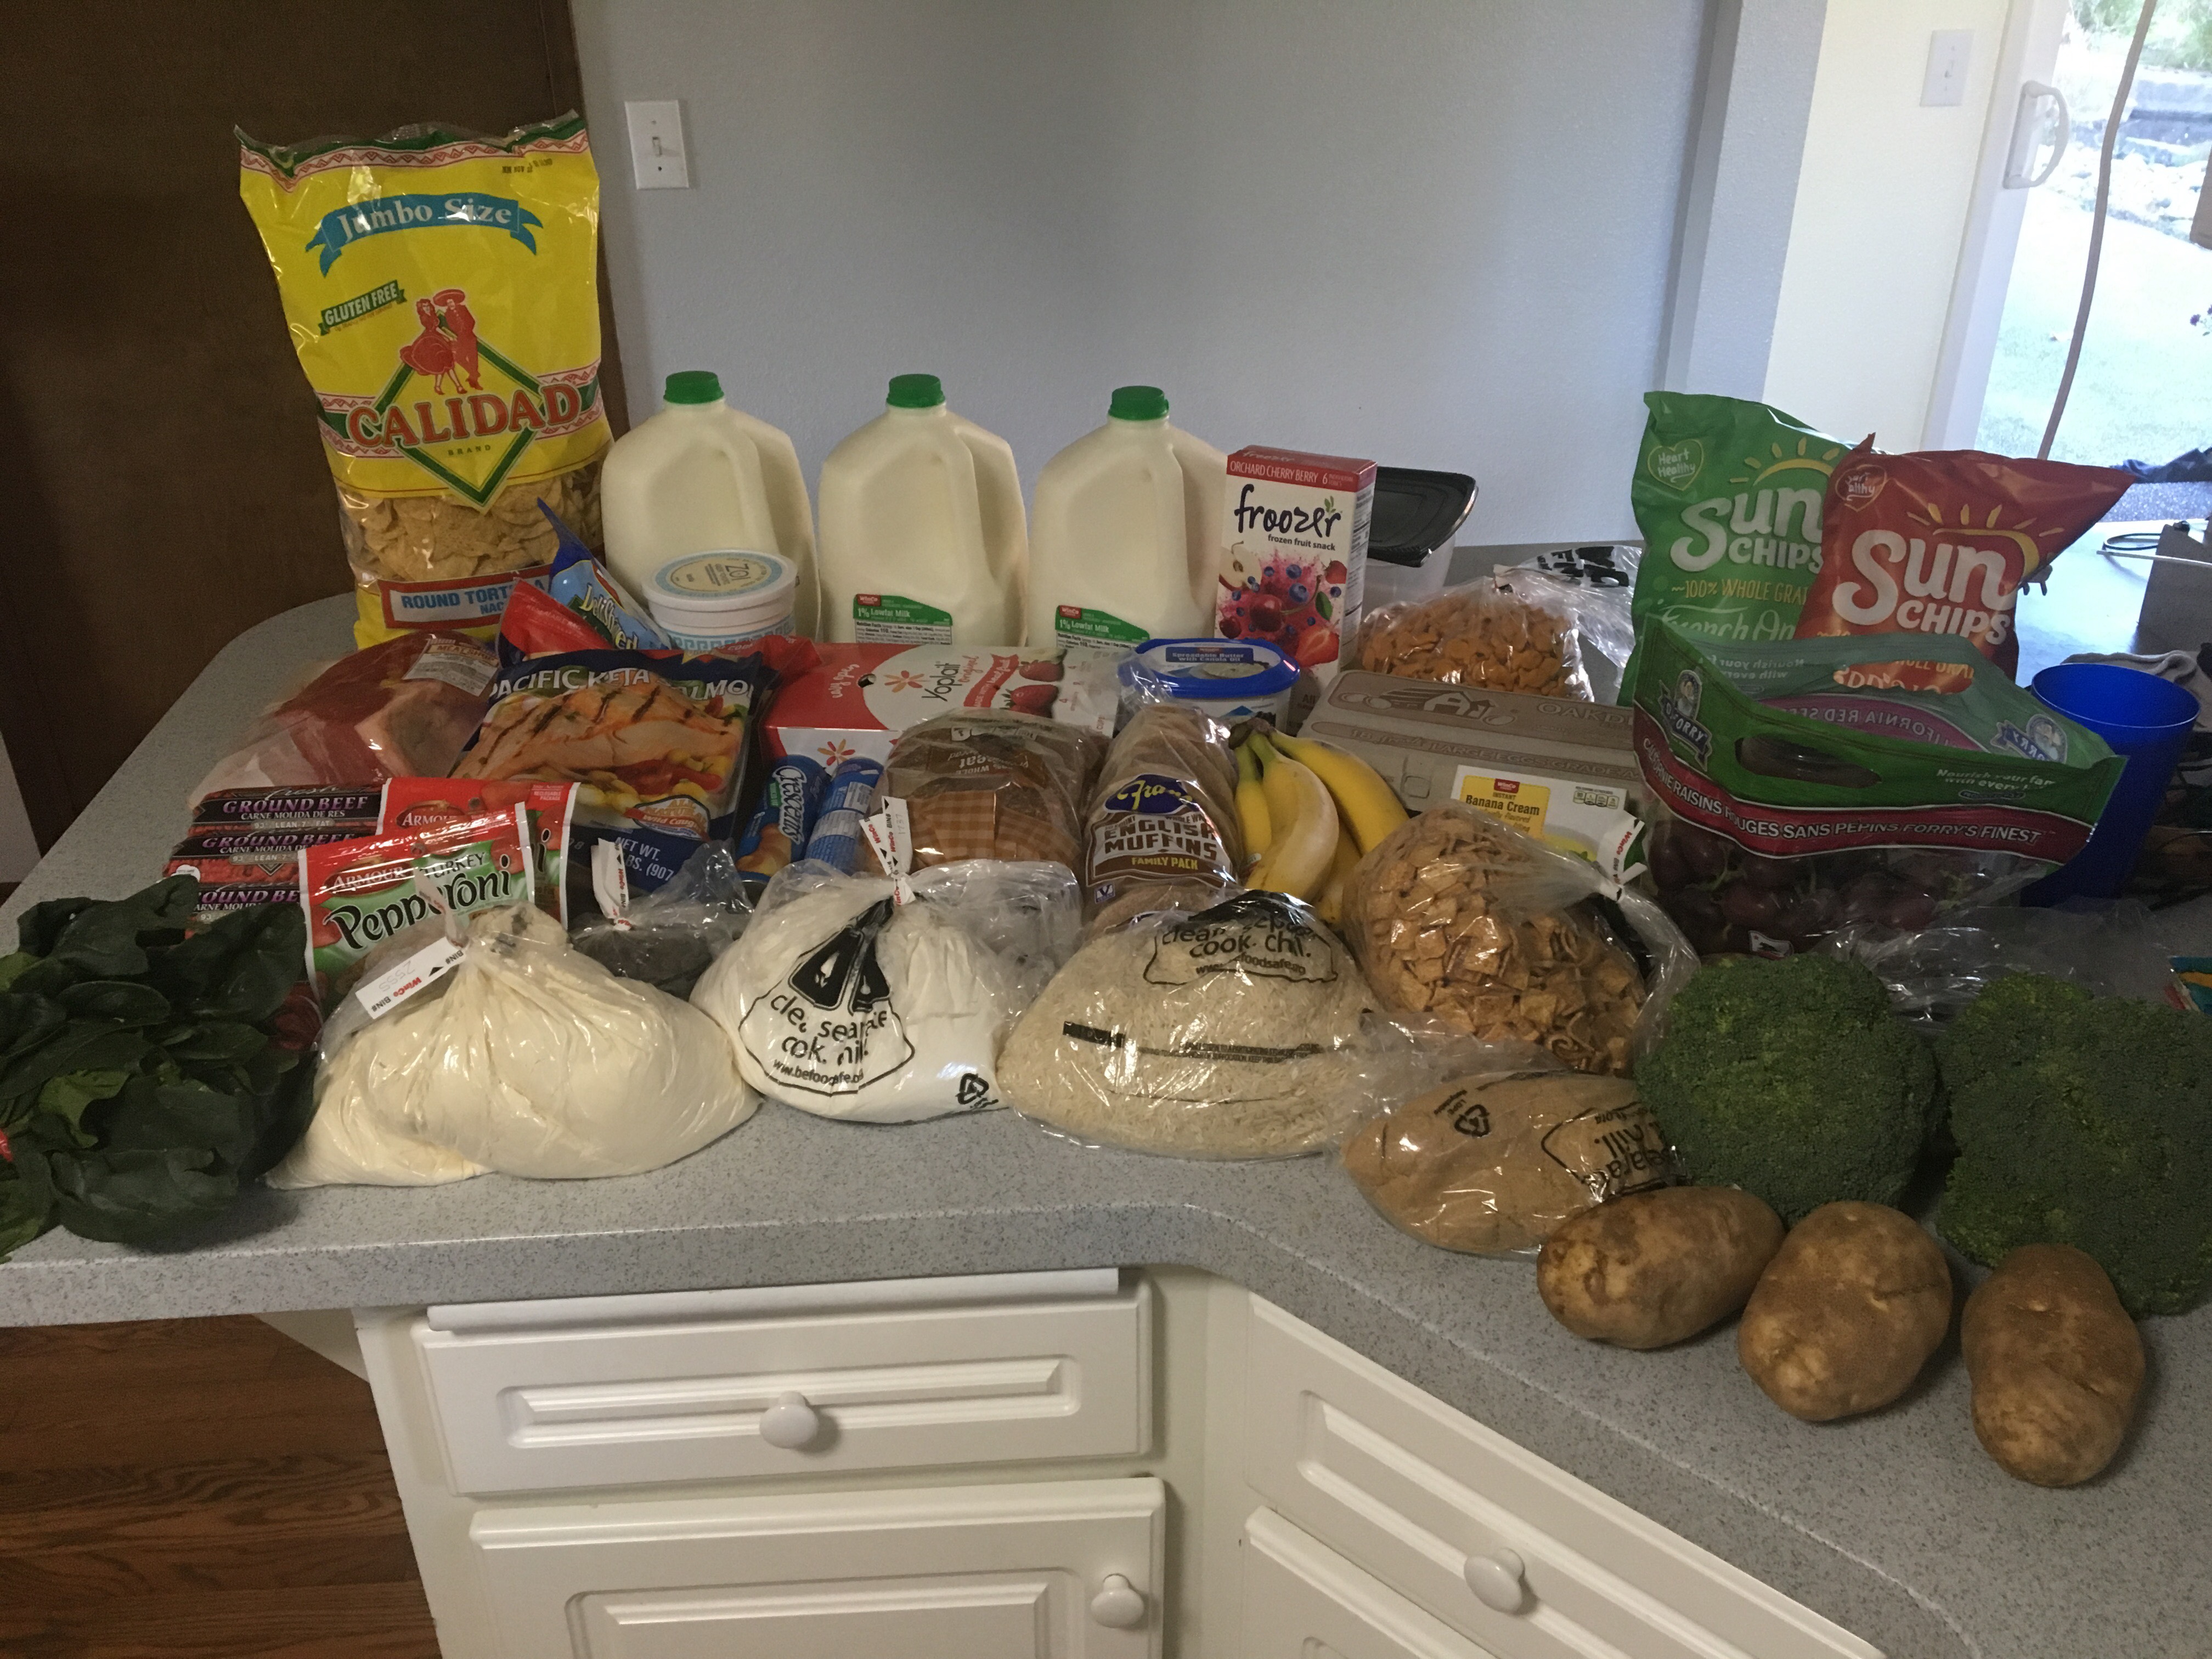
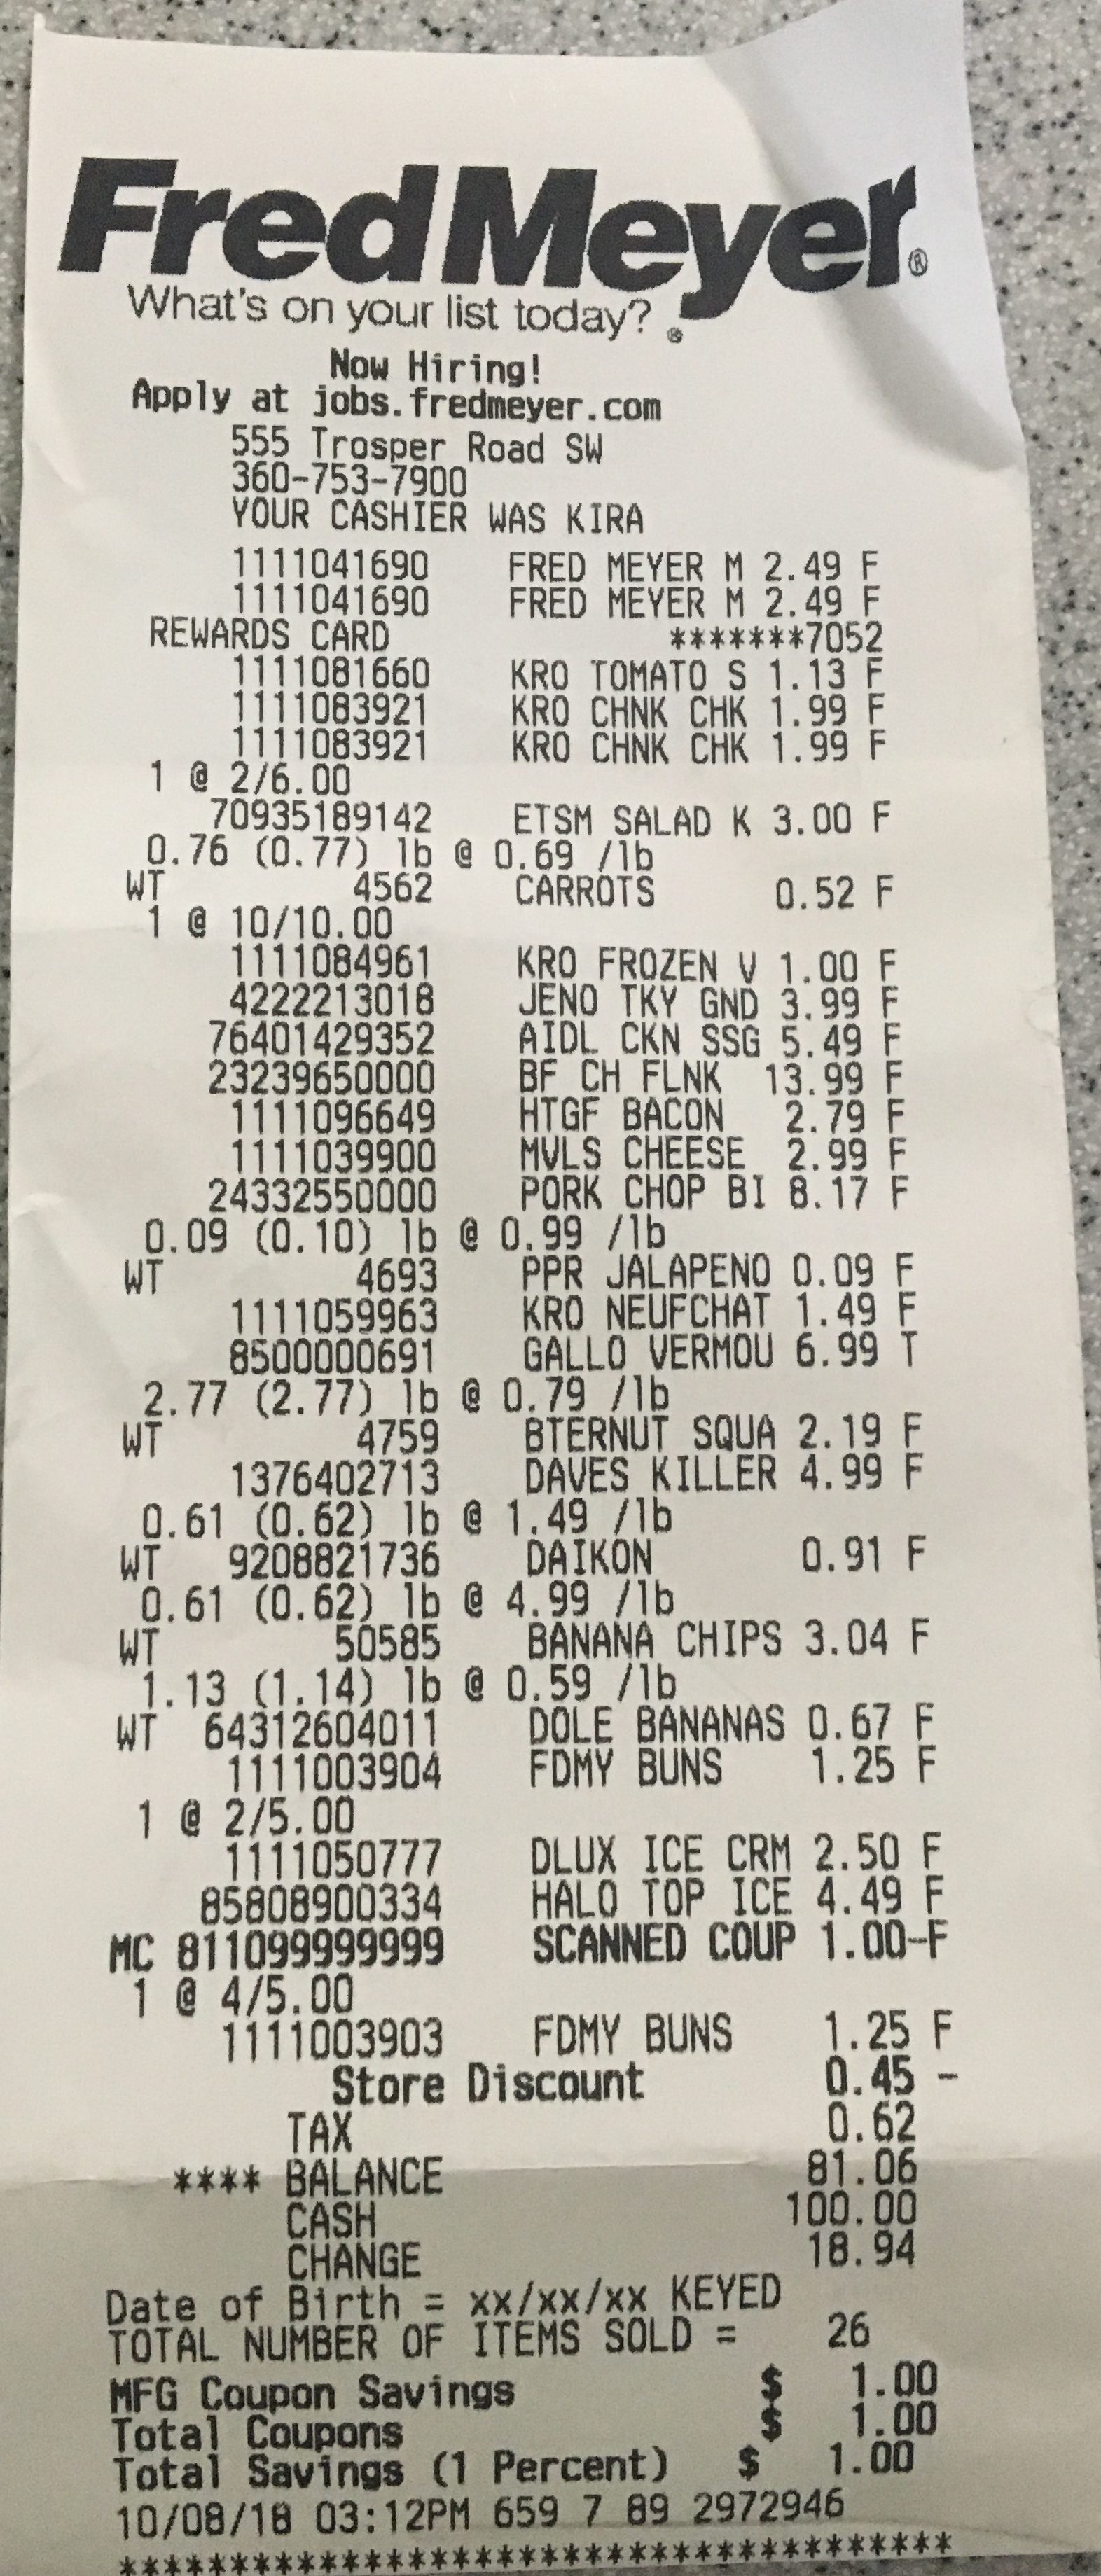
So here’s my haul and the receipt for it – I spent $81.06 on all of my “top-off” items.
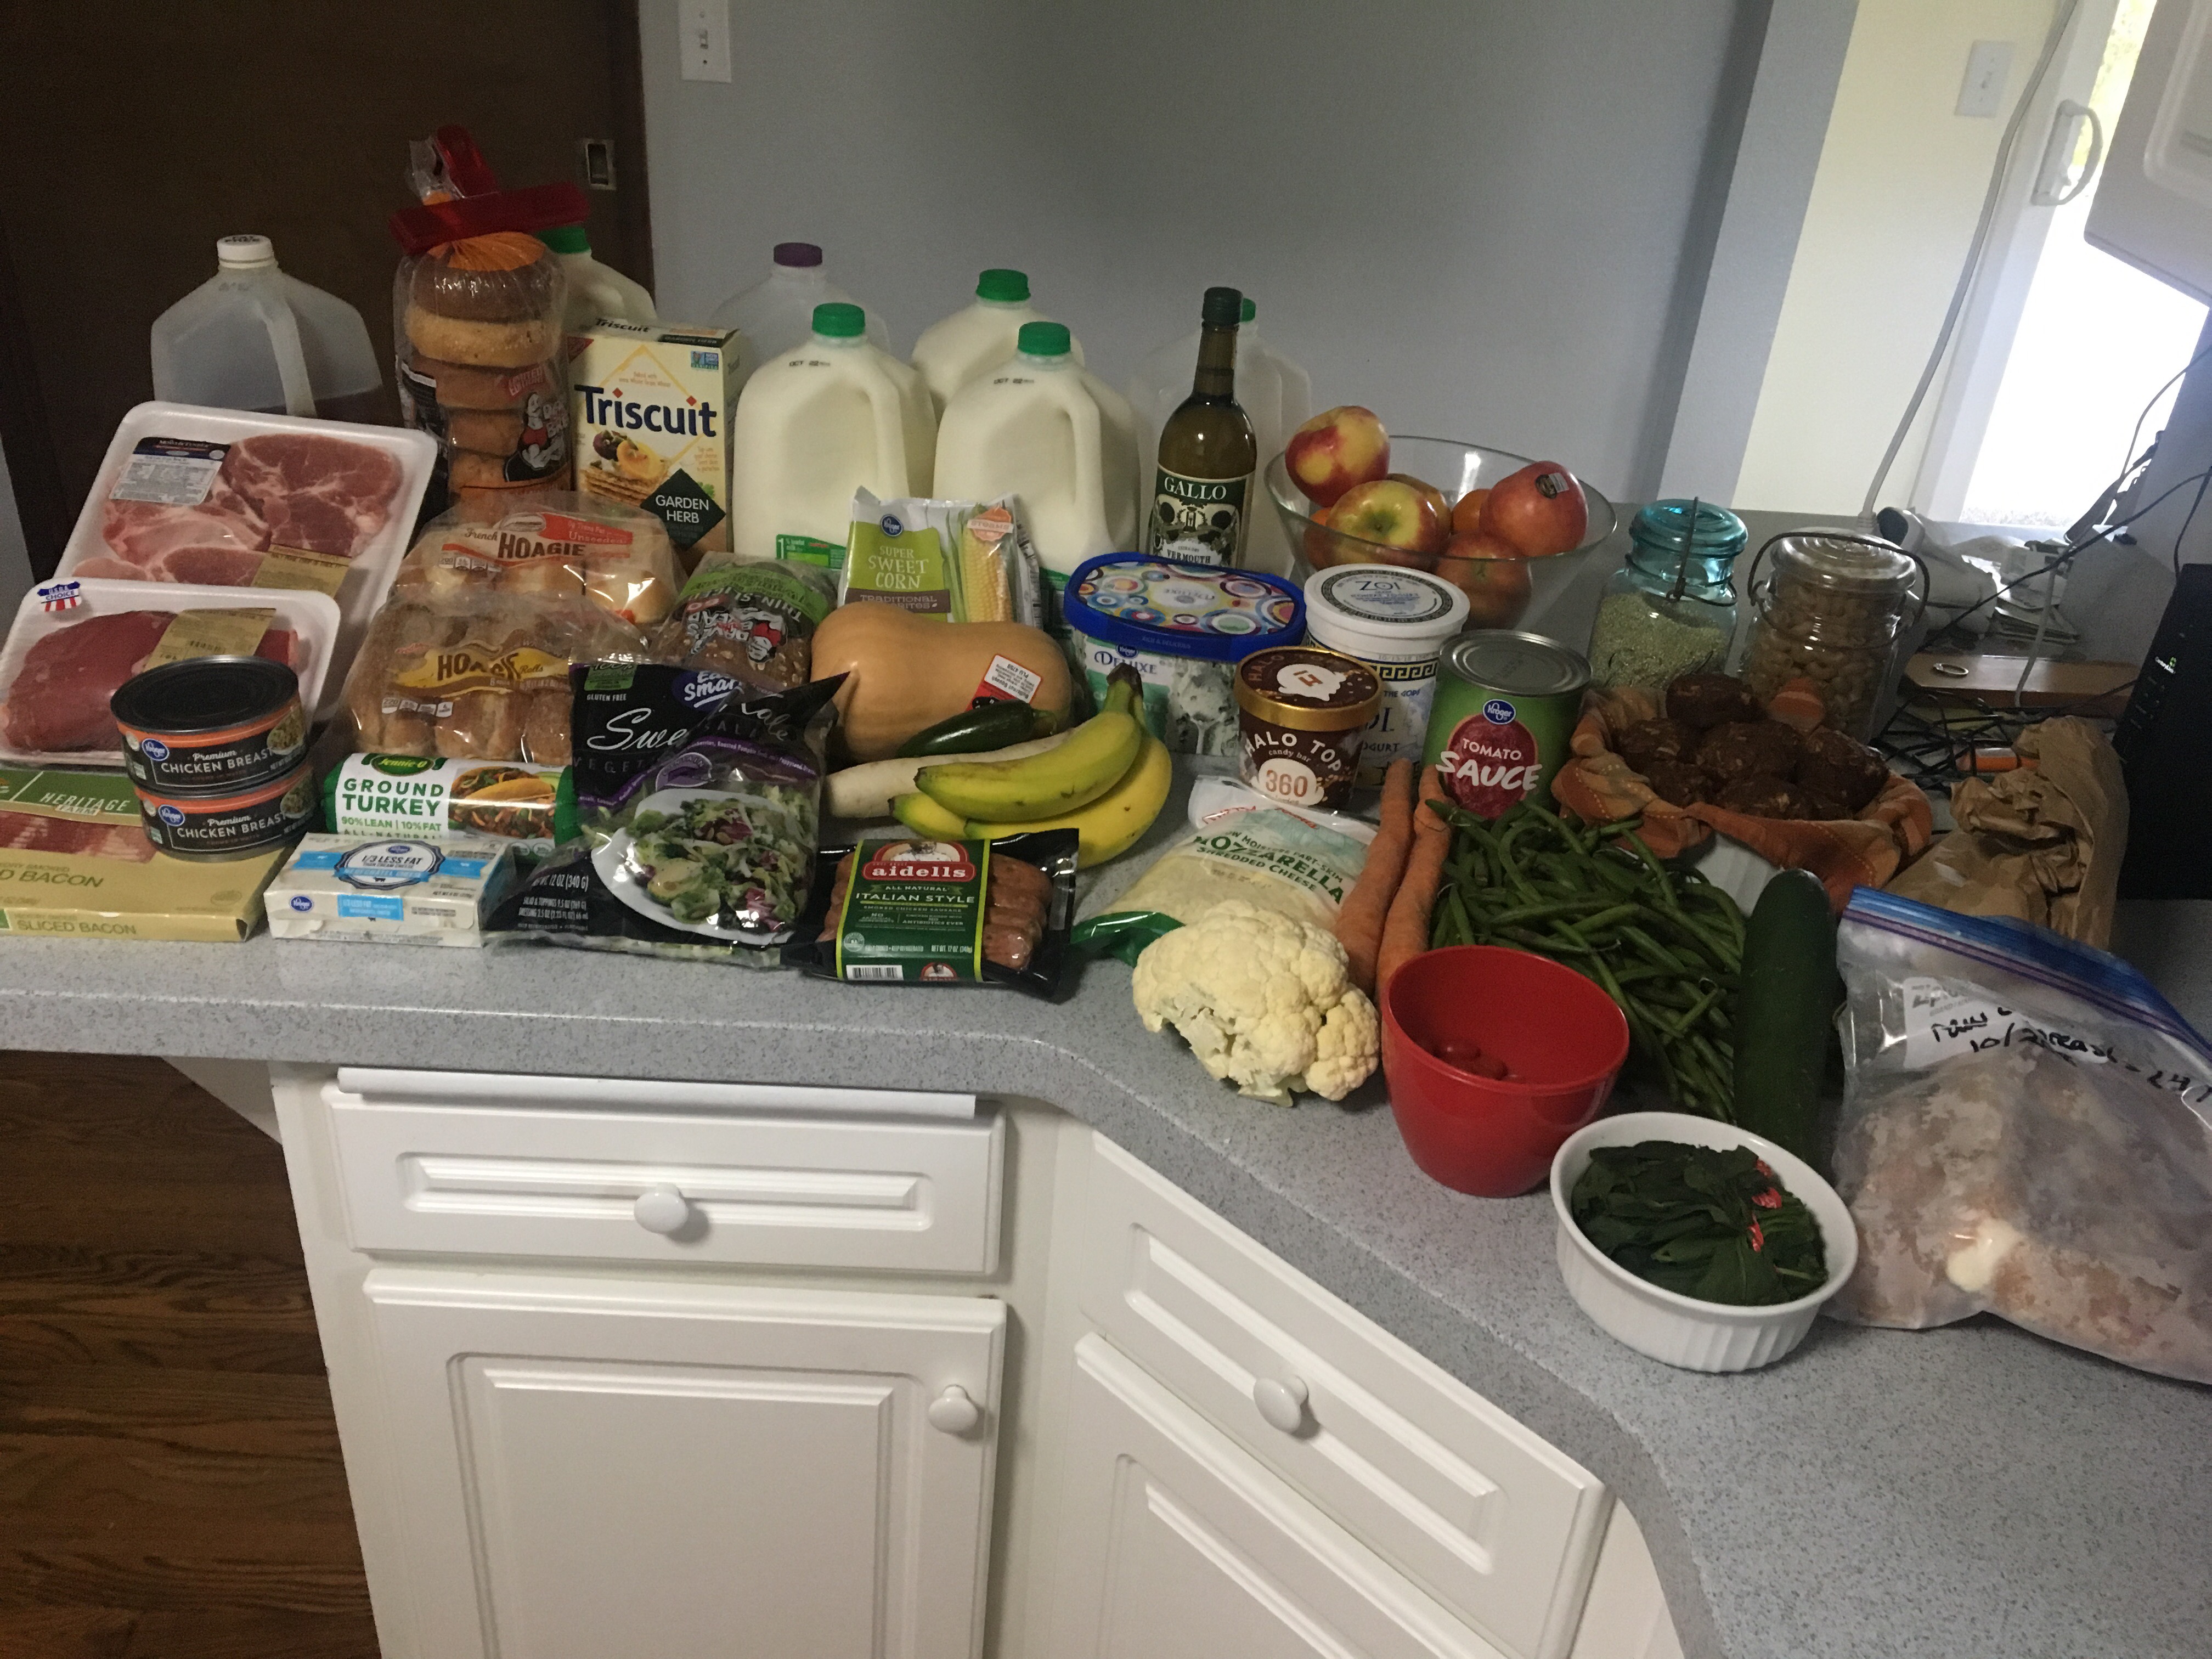
Combined with (most of) the ingredients I had from food distribution and my pantry/refrigerator, here’s a look at our food for the entire week.
Even if it seems overwhelming at first, this process gets easier with more practice. Now it only takes me 10-15 minutes to make my meal plan and stay in budget. Plus, we eat healthful, tasty food – all for an average of $100 per week!
Thanks for reading! Stay tuned for more tips on eating well on a budget – I have a lot of exciting posts planned to share with you! I walk you through a stock-up week in this post, so click there to see what my other weeks look like. Comment below with your favorite ways to keep grocery costs down!
You liked, you tagged, you voted, and the results are in…
Over the next three weeks, I will share with you the nitty-gritty of our food budget, along with every tip I’ve got for making healthy eating affordable. Stay tuned for more info on budget-friendly eating!
Congratulations to Kristin for winning our tiebreaker giveaway! I hope you love your new quick slice!
For the first time in Dietitian on a Diet history…we have a tie! In honor of this very momentous occasion (and because, why not?) I am holding a giveaway!
You loved both Eating Well on a Budget and Weight Lifting/Strength Training. One will be my next feature and the other will have to wait until another poll. Which is it gonna be? Here’s your chance to decide a) what my next feature will be and b) what the giveaway prize will be!
Here’s how to enter:
Like/follow Dietitian on a Diet on either Instagram or Facebook (or both for extra entries!)
Comment on the post featuring the image above. Include your vote (Eating Well on a Budget or Weight Lifting).
Tag friends who you think might like in on the action! Each friend you tag is an entry in the giveaway as well as another vote for your choice! Voting ends at midnight October 2nd. The winner will be selected on October 3rd by a random drawing.
If the winner picked Eating Well on a Budget, they will receive the Pampered Chef quick slice I use in my weekly food prep (you can see it in action here!). It cuts my food prep time in half! If the winner voted for Weight Lifting, they will receive a 6-in-1 high density massage roller kit for ironing out all of those worked-out muscles.
Ready…start tagging! May the best feature (and prize) win!
Which diet or lifestyle would you like me to feature next on Dietitian on a Diet? Choose carefully! 🙂 The poll will be open until midnight September 30.
One of the biggest time wasters we struggle with involves our response to daily obstacles. The things that can stand in the way of our best-laid plans. My clients are often eager and ready to come up with their “plan A.” The “if everything works as it should” plan. The “this is how I really want things to go” plan. I also encourage them to come up with contingency plans. What if everything doesn’t work as it should? What if things don’t go how you really wish they would?
Having a contingency plan helps prevent the all-or-nothing feelings that can come into play when we don’t seem to be able to make plan A work. If plan A is all we have in our healthy tool belt, then we end up defeated when it won’t work for one reason or another. Your plan failed…guess you can’t be healthy today.
Not so!
Life is often not going to work out the way you hope, so be prepared! Have a plan for when the plan doesn’t work. It’s not defeatist – it’s realistic. Have a contingency plan. This is how I usually describe them:
Plan A: This is your best-case scenario. It is the plan that is designed to help you meet your health goals and fit into your (and your family’s) lifestyle at least half the time. If you make a plan A that rarely ends up ever working, it’s probably not the right plan A for you. Remember that it’s okay to try changes out before committing to them (in fact you should!) and it’s okay if a change doesn’t work for you. Keep looking for your best fit!
Plan B: This is your “oh shoot, I didn’t have time for plan A” or “we can’t afford plan A right now” or ______insert reason plan A doesn’t work this time_____. This is not as ideal of an outcome as plan A, but still keeps you on track with a decent second-best. Ask yourself what might stand in the way of your plan A, and consider how you might adjust.
Plan C: This is your hail Mary. The “well…nothing went the way I planned so we will do the best we can with what we have today.” Sometimes you actually have a third-best option, and sometimes your plan C is just to let it go and try again tomorrow. Either way, make it an intentional choice, not an automatic response to a plan A roadblock. Plan to take a day off if plans A and B fall through, and don’t feel bad if they did. This mentally helps us stay away from thought patterns like “well, I didn’t complete plan A today, so I guess I’m not being healthy anymore.” It sounds dramatic when you say it out loud, but it’s the way a lot of our brains think. I can’t tell you how many stories I’ve heard from clients about healthy changes they did great with…until that one day, then they gave up since they had “broken their streak.”
Here are some examples of contingency plans my clients have made:
Cooking at home
Plan A (best-case-scenario, works at least half the time): Make a meal plan each week and cook at least 5 dinners at home.
Plan B (second-best option): This client felt her most likely roadblock would be not having time to make the dinner on her meal plan, so her plan B was to buy pre-cooked salmon fillets and a vegetable/red potato medley to keep in the freezer so she could always have a microwave back-up option if she got stuck in traffic on the way home from work.
Plan C (do the best you can with what you’ve got): If she comes home late and her kids have a nighttime activity, she usually needs to bring something home or take the kids out on the way. We selected 3 different restaurants (Subway, Chipotle, and Miso) that her kids would like and where everyone could customize their own healthful option.
Strength Training
Plan A: Go to the gym before work to strength train three times per week.
Plan B: This client’s gym is very busy in the afternoon, so his biggest roadblock would be getting his workout in if he missed going in the morning. If he didn’t make it to the gym before work, we selected a Youtube body weight workout he could do at home in the evening.
Plan C: If he did not want to work out in the evening when he got home, he could either try going to the gym a different morning that week, or take a day off and try again on his next scheduled gym day.
The point is, that making the plan ahead of time helps prepare you for challenges and makes any of the options okay. It allows you to realistically navigate life’s curve balls while still keeping focus on your goal. All while avoiding a defeated attitude when life just doesn’t play nice. So hang in there! Make a plan, and another, and another. And don’t beat yourself up when plan A and plan B don’t work! It happens to everyone – now you can be prepared.
Diet culture is determined to tell you that you have to be miserable to be healthy.
That couldn’t be more wrong.
Subscribe to learn how to go from a frustrated, restricted dieter to a happy, relaxed relationship with food and fitness. Healthy doesn’t have to be hard!